
Happy Valentine's Day!
-or-
Happy Single's Awareness Day!
Lemon Raspberry Sticky Buns with a Cream Cheese Lemon Glaze.
That just sounds good to me, what about you? What about your sweetheart? Here's a little dessert that might get you out of the doghouse.
This recipe is a modification of my cinnamon roll recipe, which can be found here. I actually got the idea from Natalie who made these. I had never actually thought to swap out the brown sugar and cinnamon for something with a more tart flavor but it just seems to work. While the lemon rolls themselves looked tasty, I decided to add my own touch and throw in my go-to fruit: raspberries.
I ended up taking these to Bear's Lair and Kevin's Tailgate before a Cal game. Based on the way the dish was cleaned out I figured the raspberry add-in was a success. These are totally doable as a nice little treat for your Valentine. And if your single, well, these are a bit better than chalky conversation hearts.
The recipe awaits after the jump.
This recipe is fairly straightforward and very easy if you have a stand-up mixer. You can still make it if you do not have a mixer, but it'll take some more elbow grease.
 Begin by warming up some milk to about 100 degrees Fahrenheit. Make sure the other ingredients are at room temperature and not right out of the fridge. Exact temperature is not needed, but make sure it's in the ballpark of one hundred. Gently add in the yeast and let it sit for a few minutes. After about 5 minutes, the yeast should be bubbling. Mix in the softened butter, sugar, vanilla, and one cup of the flour. Mix until combined and then add the salt, nutmeg, and lemon zest. Fold in the eggs slowly and then add the remaining flour.
 With the dough hook, knead for about 5 minutes on a medium setting, until the dough is elastic and does not stick to the hook or sides of the bowl. Remove the dough and roll into a ball. Then place the ball in a bowl and cover with a few drops of olive oil. Cover with saran wrap and let sit in a warm place for about an hour. The dough should double in size.
 In a separate bowl mix the sugar with the ginger, zest, lemon juice and fresh raspberries. Mix the filling thoroughly. Lightly grease a baking dish (13x9 inches). After the dough has risen, spread out onto a floured surface into the shape of a rectangle. Spread some butter over the entire surface of the dough.
 Take the lemon-raspberry filling and spread it over the top of the dough rectangle. Roll the dough up tightly, making sure that the filling does not get squeezed out. This is where I made a mistake and too much filling came out, leaving to a less raspberry filled sticky bun.
 Cut the sticky buns into one inch thick slices and place into the greased baking dish. Up to this point, the rolls can be prepared a day in advance. If you are ready to bake, cover the rolls with saran wrap and let sit for one hour for the second rise. After that, you can move onto the next step. If you would like to prepare these ahead of time, stop here and placed the covered rolls into the refrigerator overnight. When ready to bake, remove and let sit for at least thirty minutes to come to room temperature.
 When ready to bake, preheat the oven to 350 degrees Fahrenheit. Bake for thirty to thirty-five minutes. During this time, you can prepare the lemon glaze. In the stand-up mixer, whip the cream cheese until fluffy with the whisk attachment. Afterwards, switch to the paddle and add the lemon juice and zest. Finally, mix in the confectioners sugar and blend until creamy. I added some red dye to give a pink color.
After the sticky buns finish baking and cool for a few minutes, spread the lemon glaze heavily on top of the rolls. Serve the buns immediately.
 Begin by warming up some milk to about 100 degrees Fahrenheit. Make sure the other ingredients are at room temperature and not right out of the fridge. Exact temperature is not needed, but make sure it's in the ballpark of one hundred. Gently add in the yeast and let it sit for a few minutes. After about 5 minutes, the yeast should be bubbling. Mix in the softened butter, sugar, vanilla, and one cup of the flour. Mix until combined and then add the salt, nutmeg, and lemon zest. Fold in the eggs slowly and then add the remaining flour.
 With the dough hook, knead for about 5 minutes on a medium setting, until the dough is elastic and does not stick to the hook or sides of the bowl. Remove the dough and roll into a ball. Then place the ball in a bowl and cover with a few drops of olive oil. Cover with saran wrap and let sit in a warm place for about an hour. The dough should double in size.
 In a separate bowl mix the sugar with the ginger, zest, lemon juice and fresh raspberries. Mix the filling thoroughly. Lightly grease a baking dish (13x9 inches). After the dough has risen, spread out onto a floured surface into the shape of a rectangle. Spread some butter over the entire surface of the dough.
 Take the lemon-raspberry filling and spread it over the top of the dough rectangle. Roll the dough up tightly, making sure that the filling does not get squeezed out. This is where I made a mistake and too much filling came out, leaving to a less raspberry filled sticky bun.
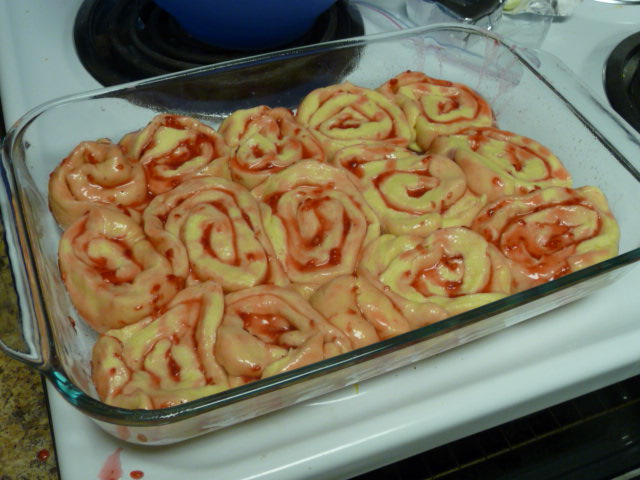 Cut the sticky buns into one inch thick slices and place into the greased baking dish. Up to this point, the rolls can be prepared a day in advance. If you are ready to bake, cover the rolls with saran wrap and let sit for one hour for the second rise. After that, you can move onto the next step. If you would like to prepare these ahead of time, stop here and placed the covered rolls into the refrigerator overnight. When ready to bake, remove and let sit for at least thirty minutes to come to room temperature.
 When ready to bake, preheat the oven to 350 degrees Fahrenheit. Bake for thirty to thirty-five minutes. During this time, you can prepare the lemon glaze. In the stand-up mixer, whip the cream cheese until fluffy with the whisk attachment. Afterwards, switch to the paddle and add the lemon juice and zest. Finally, mix in the confectioners sugar and blend until creamy. I added some red dye to give a pink color.
After the sticky buns finish baking and cool for a few minutes, spread the lemon glaze heavily on top of the rolls. Serve the buns immediately.

Lemon Raspberry Sticky Buns with Lemon Cream Cheese Glaze
Ingredients
1 packet yeast
3/4 cup milk
1 stick butter, unsalted and softened
1/4 cup sugar
2 tsp vanilla
4 1/2 cups flour
1/2 tsp salt
1/2 tsp nutmeg
2 lemons, zested
2 eggs
1 cup sugar
1/2 tsp ginger, powdered
1 lemon, zested and juiced
1 cup raspberries, fresh
3 tbs butter, unsalted
4 ounces cream cheese
1 lemon, zested and juiced
1 cup confectioners sugar
Directions
- Warm up the milk to 100 degrees Fahrenheit. Mix the yeast in with the milk and let it sit for a few minutes until it bubbles. Stir in the buffer, sugar, vanilla, and one cup of the flour. Add in the salt, nutmeg, and lemon zest. Fold in the eggs until just combined. Slowly add in the remaining flour. Using your electric mixer and a dough hook, knead until the dough is elastic and does not stick to the hook anymore, about 5-7 minutes.
- Take the dough and form it into a ball and cover with a few drops of olive oil. Place into a bowl and cover in a warm place for about an hour.
- In another bowl, mix the sugar, ginger and zest with your hands until the sugar has a slight moist consistency, then add in the juice of one lemon and fold in the fresh raspberries.
- Grease a 13x9 inch baking dish. On a lightly floured countertop, pat the dough into a large rectangle. Cover the top with butter and spread the lemon-raspberry mixture on top. Roll the dough up. Be careful to make sure the raspberry filling does not leak out. Cut the roll into inch thick slices and place into the baking dish. Cover the rolls.
- Up until this point, you can prepare these the day before you plan on cooking them. If you are baking same day, heat the oven to 350 degrees Fahrenheit and let the covered rolls rise for about an hour. They should double in size. If you are preparing these a day in advance, placed the covered rolls in the refrigerator for the second rise over night. Make sure you let them sit out to warm up to room temperature before you bake.
- Bake the rolls at 350 degrees Fahrenheit for 30-35 minutes.
- While the rolls for baking, prepare the topping. In a standup mixer and the whisk, whip the cream cheese until fluffy. Switch to the paddle and add the lemon juice, zest and confectioners sugar. Blend until smooth and creamy. I added some red food dye to give a pink look.
- After the sticky buns are finished, smear the glaze over the top and serve immediately.
In our life love plays a very specific role, Now you are able to make your love life healthy and it has no space for any type trouble. These all are possible with the help of AGBAZARA SOLUTION TEMPLE. He helped me cast a spell that brought my long lost lover back within 48hours who left me for another woman. you can also contact him on ( agbazara@gmail.com ). and be happy forever like am now with his experience.
ReplyDelete